Nov 14 2013
by Abhay
Windows 8 was released with a bang with Metro interface, interesting apps, and many awesome goodies. Putting efforts on everything a user demands, Microsoft’s developments result in outstanding products. The firm has been releasing various operating systems, each with improvements in design, features, and performance. As compared to other computers, Windows-based systems draw a large number of customers across the world. With the recent operating system, Windows 8, users have had a never before experience. However, you can never rely on a machine, as there is no assurance if it will perform the same way forever or start creating issues at a point of time.
You might have come across various issues with earlier Windows versions, such as system failure/crash, etc. Windows 8 is also not far from issues and may bring such complications once you drift your attention from it. Whether it is Windows 8 or any other operating system from the same series, you need to fix the issues when they occur; otherwise, you will feel like a handicapped. In some severe cases, you fail to use your computer until it is repaired. A fortunate thing is that Windows 8 allows administrators to create a system repair disk (CD/DVD) or recovery drive (USB) that can be used to repair Windows 8 based system, if it behaves abnormally or refuses to start. Moreover, you can use this drive to copy the recovery partition of your computer and create a backup copy. Once backup copy is successfully created, you can remove the partition from the system if you want to make space on the hard drive.
This is how the system repair disk works magically. Below is a procedural description on how you can create a recovery drive or system repair disk and how to use it. Let us first look at how to create the recovery drive (USB), which is a newly introduced feature in Windows 8.
Note that you need to make certain that you are performing the procedure with full attention, as choosing a wrong option will result in something that you did not expect. Also, make sure that you follow the given instructions carefully.
Procedure:
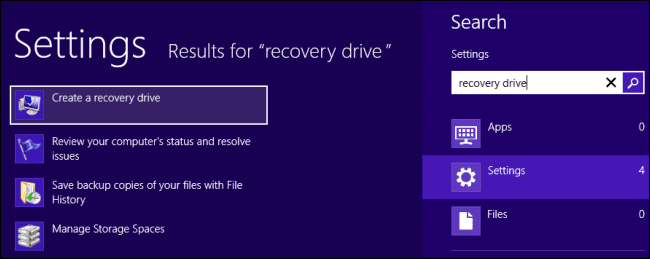
Press Windows key and type ‘recovery drive’. Click ‘Settings’, and then click ‘Create a recovery drive application’ as shown below.

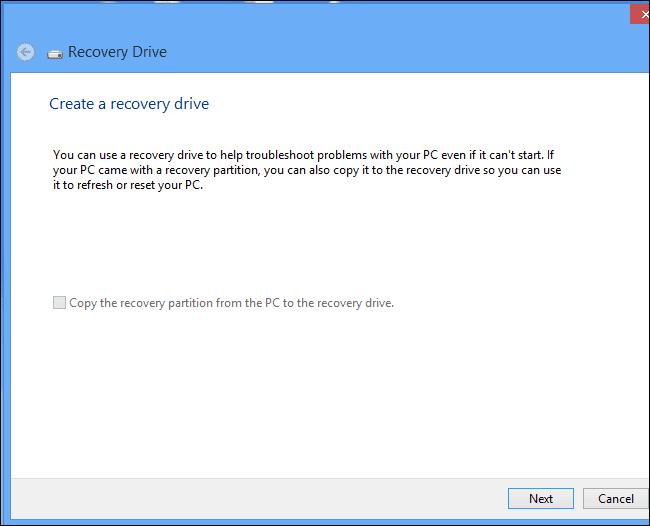
The application will be visible on the desktop. If there is a default recovery partition on your system, copy the partition to recovery drive. Since it needs a good amount of space, make sure that the USB you are using has sufficient space. If you are done with copying the partition, you will be asked if you want to recover it from the hard drive. It is recommended to remove it to free up gigabytes on the drive.

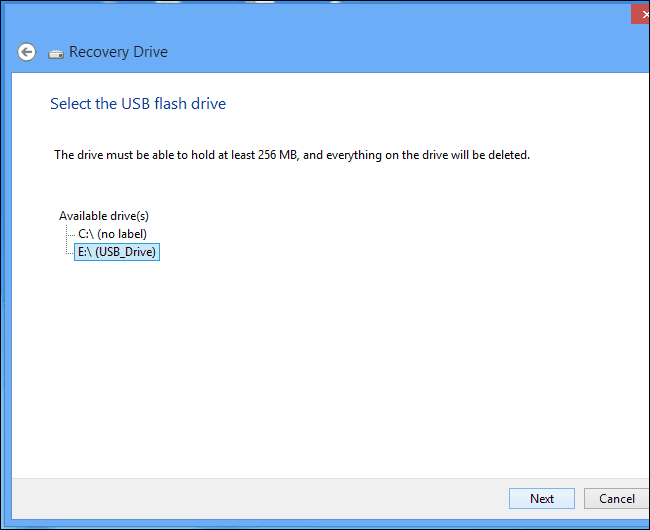
Click the ‘Next’ button. Following, the tool will prompt you to select the USB, click ‘Create’. It will copy the files to the connected USB.

On completion of the process, the tool will ask you if you want to delete recovery partition. If you choose to delete, you need to reset your computer by using the drive you just created.
Next section includes the steps to create a system repair disc; the feature is also available in Windows 7. Perform the following steps to create a disc in Windows 8:

Press Windows key and type ‘recdisc’ to open the utility to create system repair disc. The tool will be visible on desktop.

Select the Drive from dropdown. Click on ‘Create disc’ to create the recovery disc. You are now done with the process.
Next section will let you know how to use the system repair disc or recovery drive. It is not mandatory for you to use the recovery drive because if your Windows 8 computer refuses to boot frequently, it automatically implements the advanced startup options. However, in some cases, Windows is not able to automatically use these options; in such situations, you need system repair disc, installation disc, or the recovery drive.
Simply connect the recovery drive (USB) to your computer. The computer will automatically boot from it, or if it does not, change the boot order.
When the system boots, the system will provide troubleshooting and repairing options as follows:

You may choose to refresh or reset your PC. If you click ‘Advanced options’, it is further divided in various options, such as you can use system restore, repair your computer automatically, recover from system image, etc. You can also fix the issue from command prompt. System Restore and Automatic Repair allow you to resolve the problem when your PC strictly denies to boot.

So, have you succeeded in troubleshooting or system still cannot boot? Yes, it is possible that the system fails to boot after trying out all the options bundled with your Windows 8 machine. What do you choose to do in such cases; will you just leave your system as is and wait for a miracle? If so, you will be hung up with the problem forever. Well, not to worry!
There is a large number of recovery apps for Windows available on the market. The software will automate the process and provide expected results in less time. However, you just do not have to pick one from the clutter of hundreds, rather do an in-depth analysis on the product, go through reviews, try out demo version, and then purchase the product that you found best.
Windows 8 was released with a bang with Metro interface, interesting apps, and many awesome goodies. Putting efforts on everything a user demands, Microsoft’s developments result in outstanding products. The firm has been releasing various operating systems, each with improvements in design, features, and performance. As compared to other computers, Windows-based systems draw a large number of customers across the world. With the recent operating system, Windows 8, users have had a never before experience. However, you can never rely on a machine, as there is no assurance if it will perform the same way forever or start creating issues at a point of time.
You might have come across various issues with earlier Windows versions, such as system failure/crash, etc. Windows 8 is also not far from issues and may bring such complications once you drift your attention from it. Whether it is Windows 8 or any other operating system from the same series, you need to fix the issues when they occur; otherwise, you will feel like a handicapped. In some severe cases, you fail to use your computer until it is repaired. A fortunate thing is that Windows 8 allows administrators to create a system repair disk (CD/DVD) or recovery drive (USB) that can be used to repair Windows 8 based system, if it behaves abnormally or refuses to start. Moreover, you can use this drive to copy the recovery partition of your computer and create a backup copy. Once backup copy is successfully created, you can remove the partition from the system if you want to make space on the hard drive.
This is how the system repair disk works magically. Below is a procedural description on how you can create a recovery drive or system repair disk and how to use it. Let us first look at how to create the recovery drive (USB), which is a newly introduced feature in Windows 8.
Note that you need to make certain that you are performing the procedure with full attention, as choosing a wrong option will result in something that you did not expect. Also, make sure that you follow the given instructions carefully.
Procedure:
Press Windows key and type ‘recovery drive’. Click ‘Settings’, and then click ‘Create a recovery drive application’ as shown below.
The application will be visible on the desktop. If there is a default recovery partition on your system, copy the partition to recovery drive. Since it needs a good amount of space, make sure that the USB you are using has sufficient space. If you are done with copying the partition, you will be asked if you want to recover it from the hard drive. It is recommended to remove it to free up gigabytes on the drive.
Click the ‘Next’ button. Following, the tool will prompt you to select the USB, click ‘Create’. It will copy the files to the connected USB.
On completion of the process, the tool will ask you if you want to delete recovery partition. If you choose to delete, you need to reset your computer by using the drive you just created.
Next section includes the steps to create a system repair disc; the feature is also available in Windows 7. Perform the following steps to create a disc in Windows 8:
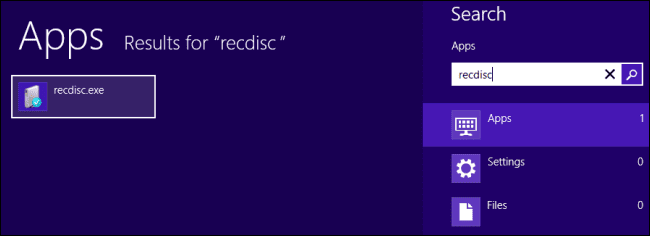
Press Windows key and type ‘recdisc’ to open the utility to create system repair disc. The tool will be visible on desktop.
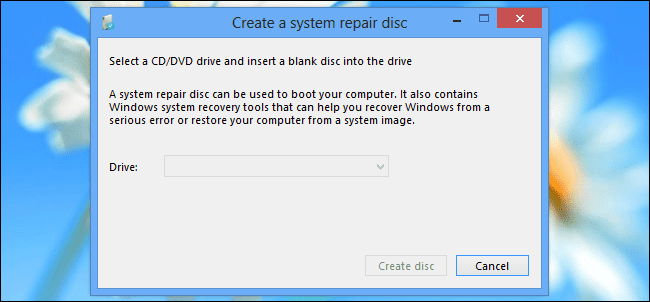
Select the Drive from dropdown. Click on ‘Create disc’ to create the recovery disc. You are now done with the process.
Next section will let you know how to use the system repair disc or recovery drive. It is not mandatory for you to use the recovery drive because if your Windows 8 computer refuses to boot frequently, it automatically implements the advanced startup options. However, in some cases, Windows is not able to automatically use these options; in such situations, you need system repair disc, installation disc, or the recovery drive.
Simply connect the recovery drive (USB) to your computer. The computer will automatically boot from it, or if it does not, change the boot order.
When the system boots, the system will provide troubleshooting and repairing options as follows:

You may choose to refresh or reset your PC. If you click ‘Advanced options’, it is further divided in various options, such as you can use system restore, repair your computer automatically, recover from system image, etc. You can also fix the issue from command prompt. System Restore and Automatic Repair allow you to resolve the problem when your PC strictly denies to boot.

So, have you succeeded in troubleshooting or system still cannot boot? Yes, it is possible that the system fails to boot after trying out all the options bundled with your Windows 8 machine. What do you choose to do in such cases; will you just leave your system as is and wait for a miracle? If so, you will be hung up with the problem forever. Well, not to worry!
There is a large number of recovery apps for Windows available on the market. The software will automate the process and provide expected results in less time. However, you just do not have to pick one from the clutter of hundreds, rather do an in-depth analysis on the product, go through reviews, try out demo version, and then purchase the product that you found best.
No comments:
Post a Comment